Today’s Post by Joe Farace
") In a Travel Tuesday post that was entitled “Infrared in Black & White,” I suggested that you shoot in monochrome mode and if you do no white balance needed. After all, everything is right there on your LCD.
In a Travel Tuesday post that was entitled “Infrared in Black & White,” I suggested that you shoot in monochrome mode and if you do no white balance needed. After all, everything is right there on your LCD.
As I’ve gained more experience in working with my Panasonic Lumix G6 that was converted to infrared by LifePixel with their Enhanced IR filter I’ve had a change of heart. This particular filter is equivalent to a 665nm filter and allows more visible colored light to pass through to the sensor and is especially suited for color IR photography with great saturation and color range.
nanometers—In the International System of Units, the prefix “nano” means one-billion so, one nanometer is one-billionth of a meter. Infrared light has some of the same properties as visible light. It can be focused and reflected like visible light and can be aligned and even polarized. Infrared film is sensitive to IR radiation, some ultraviolet radiation and to all of the wavelengths of visible light but is not as sensitive to green light.
 Based on most of my recent experience, I don’t think that’s the best way to shoot with this filter because it seems more sensitive to variations in exposure than my Lumix G5 with Standard IR conversion (720nm) that was used to make the above image. Overexposed Enhanced IR images can still be used to produce a good black & white image, because as LifePixel themselves state, “BW also looks quite good although with a bit less contrast without adjustments.”
Since traditional histograms don’t work as well for infrared capture, you can get some idea of the sky/foreground separation directly on the camera’s LCD screen or EVF for mirrorless shooters. The magenta-charged images on the LCD screen look a bit like color negative film and may be a harder to view but you can clearly see separation between the sky and foreground, if there is any. With sufficient separation you can produce the kind of color infrared images shown in my tutorial How to Produce the Blue Sky Infrared Technique. Obtaining proper exposure when shooting with the Enhanced IR filter—bracketing may be required—lets you to produce images like the bridge photograph below.

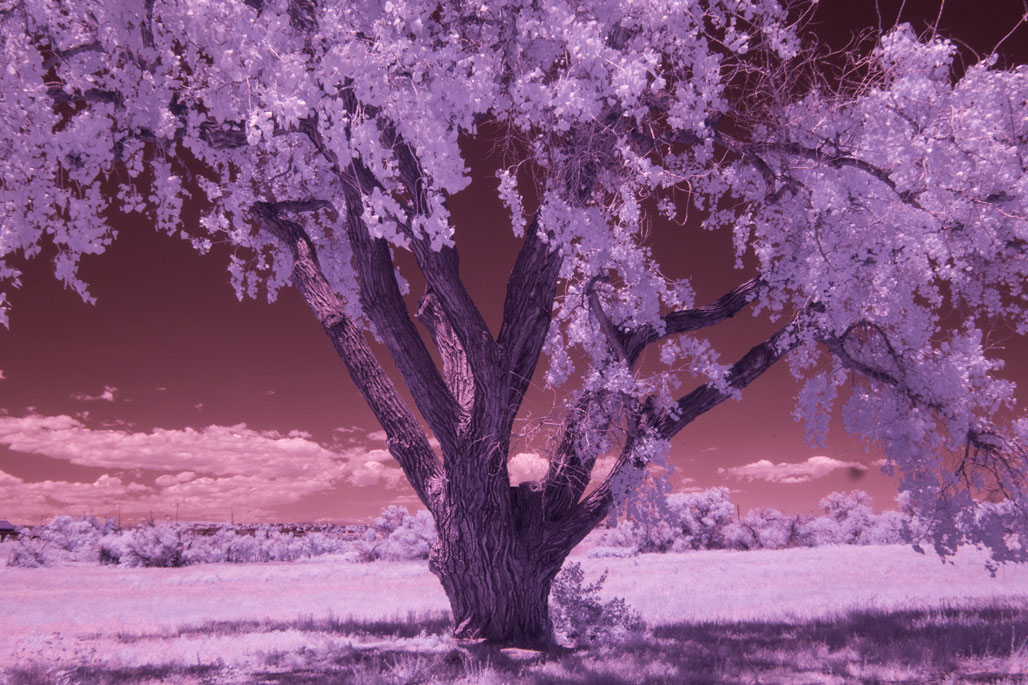
How I made this photograph: I photographed this tree in McCabe Meadows, my favorite local place to make infrared images. The camera used was a Panasonic Lumix G6 that had the Enhanced IR (665nm) filter conversion from Life Pixel. Lens used was the Olympus M. Zuiko17mm f/2.8 (34mm equivalent) with an exposure pf 1/200 sec at f/16 and ISO 400. The RAW file was opened and tweaked in Adobe Camera RAW and finally toned using the Platinum tone option in PhotoKit 2.0.
 I’ve found that Life Pixel does a great job with IR conversions and they’ve done most of the conversions for some of my Canon DSLRs and all of my Panasonic Lumix G-series cameras. This is not a paid or sponsored endorsement, just my experience.
My book, The Complete Guide to Digital Infrared Photography is available from Amazon with new copies available for $8.35 and used copies selling for around four bucks as I write this. Creative Digital Monochrome Effects has a chapter on IR photography and is available from Amazon new for $11.46 with used copies starting around four bucks.