Today’s Post by Joe Farace
I have an extensive memory of useless and often irrelevant quotes but I am not great when it comes to remembering the sources.–Mark Twain
 On Micro Four-thirds format cameras, the Laowa 7.5mm f/2 lens produces the equivalent angle-of-view of a 15mm lens. At $389, this is not an overly expensive lens but neither is it inexpensive, at least to my way of thinking. The build quality is near Zeiss levels with nary a trace of plastic in sight, except for the lens cap. Even the lens hood is metal. The lens is available in black or silver finish although the latter seems in short supply. Weighing in at only 5.29 oz, the lens is small, almost tiny and while it looked perfectly natural on my Panasonic Lumix G6 , it appeared decidedly out of place attached to the larger Lumix GH4.
Nighttime the Right time in Infrared?
Laowa’s 7.5mm f/2 is designed to produce a rectilinear image but it does not always render objects on the edge of the frame with straight vertical lines and minimal distortion. The image below was lightly perspective corrected using the Edit>Transform>Perspective command in Photoshop. You can see the untweaked image as a RAW file at above right.
The lens’s optical design incorporates two aspherical elements with three extra-low dispersion elements to control distortion and aberrations. A Frog Eye Coating has been applied to the front element to guard against water and dust. You can even fit 46mm filters for protection but I would advise that you find the thinnest mount filter possible to avoid the possibility of it vignetting with the lens’s wide 110 degree angle-of-view. The Laowa 7.5mm will focus close, as near as t 4.7-inches. And yes, it’s also manual focus; we’ll get to that shortly.
The manufacturer feels that the lens is well-suited to wide-angle subjects as well as astrophotography and I did some infrared photography using my Lumix G6 that had the Enhanced IR conversion from Life Pixel.
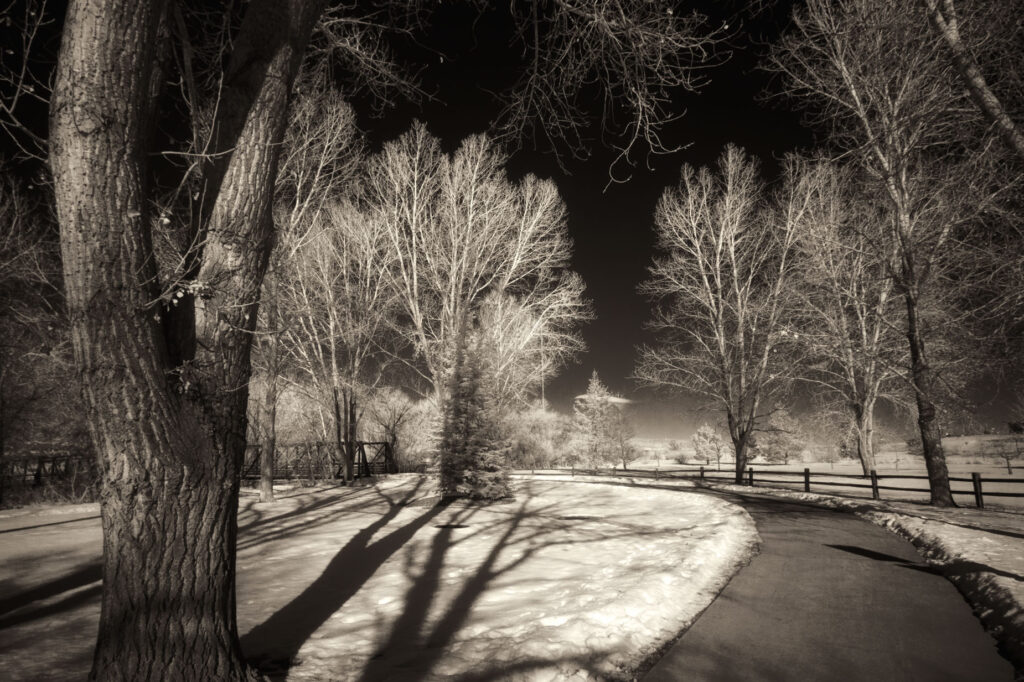
How I made this photograph: The camera used for this image was a Panasonic Lumix G6; The lens type and aperture will not show up in the file’s EXIF data because there is no electronic connection between camera and the Laowa lens. The above image was shot in Av mode with an exposure of 1/800 sec at f/11 and ISO 400. The RAW file was converted to monochrome using Silver Efex’s High Contrast (harsh) preset for a deliberate nighttime look. While inside the plug in I applied the middle level of Silver Efex’s Sepia toning option which produces the best sepia look of any software I’ve used to date. To me, most of them are too orange.
I typically shoot infrared images around f/16 to minimize focus problems . but in this case shot at f/11; the lens’s smallest aperture is f/22. I used the hyperfocal method of focusing . and here’s how that works with manual lenses like the Laowa: You select an aperture on the nicely knurled aperture ring, then rotate the wider focusing ring so that aperture appears opposite the infinity mark on the lens’s engraved depth-of-field scale. I set it at f/11 there and all of the images that I made at McCabe Meadows were in sharp focus and free of any diffraction.
 I’ve found that Life Pixel does a great job with IR conversions and they’ve done some of the conversions for my Canon DSLRs and all of my Panasonic Lumix G-series cameras. This is not a paid or sponsored endorsement, just my experience.
New copies of my book, The Complete Guide to Digital Infrared Photography are available from Amazon for $41.79, with used copies selling for around seventeen bucks, as I write this. Used copes of my book Creative Digital Monochrome Effects that has a chapter on IR photography are available from Amazon for around nine buck, as I write this.