Today’s Post by Joe Farace
One of the biggest advantages digital imaging has over traditional film photography seems to be the ability to sharpen your images, although truth be told, you can probably sharpen your scanned film images using these vert same techniques.
 Many image editing programs, including Adobe Photoshop, contain a Sharpen command that works by raising the contrast of adjacent pixels but sometimes this increased sharpness occurs at the expense of overall contrast. As it turns out, some photographs can handle additional contrast better than others before loosing highlight detail. A better choice would be to use the unlikely named and wonderfully practical Unsharp Mask (Filter > Sharpen > Unsharp Mask) command found in Photoshop and some other image-enhancement software to sharpen a photograph.
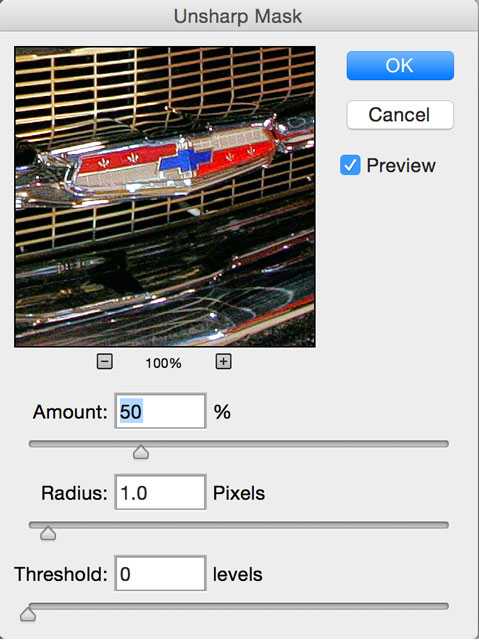 Photoshop’s Unsharp Mask’s dialog box* gives you three sliders that let you control sharpness. The Amount slider displays the percentage of sharpening that will be applied to your photograph. Don’t be afraid to apply more than 100 percent to high-resolution files but lower resolution images quickly fall apart fast if higher amounts are used. The Radius slider determines the number of pixels surrounding the edge pixels that will be sharpened. Lower values sharpen some edge pixels, while higher values sharpen a wider range of them. The Threshold slider determines how different that sharpened pixels must be from their surrounding area in order to be considered edge pixels. The default value of zero sharpens all pixels in the image.
Tip: Here’s a useful way of dealing with color fringing that may occur when applying Unsharp Mask. After sharpening the image file, go to the Fade command (Edit > Fade Unsharp Mask) that appears only after any filter is applied. Don’t change the Opacity setting, leave it at 100%, but instead select Luminosity from the pop-up menu. Any color artifacts should be gone or if not, at least, minimized.
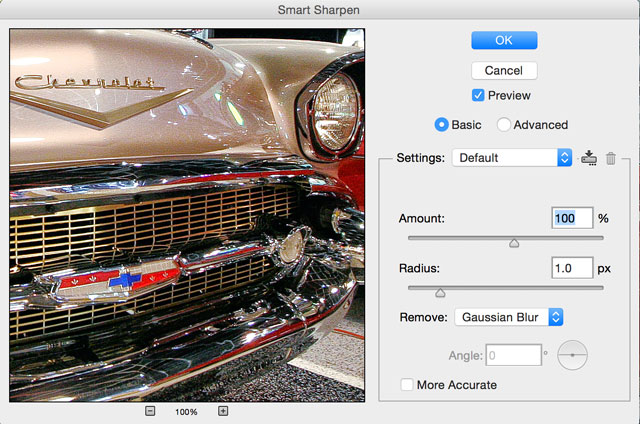 Photoshop’s Smart Sharpen (Filter > Sharpen > Smart Sharpen.) has a dialog box that’s similar to Unsharp Mask but includes an advanced Mode featuring three additional tabs, including Shadow and Highlight. The first two sliders are Amount and Radius and act just as they did in Unsharp Mask but in place of Threshold, there’s a pop-up menu that lets you control sharpness for specific kinds of lack-of-sharpness problem including Gaussian, Motion and Lens Blur.
*Note: The dialog boxes shown are for Photoshop CS6, not their subscription model. Why am I using this old software? I can’t afford all the system and software need to make the necessary updates.

Along with photographer Barry Staver, I’m co-author of Better Available Light Digital Photography that’s available from Amazon for $21.50 prices with used copies selling at giveaway prices. around five bucks, as I write this.