The Ford Model T was an iconic automobile that changed America. Model T Day is celebrated on October 1 to commemorate the day that changed how America traveled its roads.
Today’s Post by Joe Farace
I’ve always liked speed. I own a car that I shouldn’t be talking about because I’m an environmentalist, but the 1955 Porsche Spyder 550 RS is the finest sports car ever made. —Robert Redford
One way to add color to a monochrome photograph is to start with a black and white image file and paint in the colors on separate layers. You can use Photoshop or any image-editing program that lets you work with layers to simulate this hand-coloring technique from the 1950s. This process is not only faster to accomplish digitally but any mistakes you make can be immediately fixed using the program’s History palette that lets you go back before you made that error. After you’ve completed a masterpiece, you can fix any nagging miscues or even change a color by deleting a color layer, adding a new one and painting in the new color.
Let me show you how I did it for this Porsche Speedster but instead of just any black and white image, we’re going to use one that was captured in digital infrared.
Here’s How to Do It
 This reference image of a classic Porsche Speedster was photographed at a car show in Denver, Colorado using a Canon EOS D30 that had been converted for infrared capture (720nm) by a company no longer in business. The exposure was 1/100 sec and f/16 at ISO 200. It was captured as a RAW file and initially opened in Adobe Camera RAW.
Tip: When hand coloring a monochrome file, you cannot work with a grayscale image. You need to work with an RGB or CMYK file, so you may have to change the image’s Mode (Image > Mode > Color RGB.)
 The original RAW file (at right) was converted into monochrome using Silver Efex and opened in Adobe Photoshop where it was dust spotted and tweaked. I then used the Clone Stamp tool to remove two guys who were standing behind the car in the background.
 Next, add a Color Layer (Layer > New > Layer > Color) and select Color from the Layer palette’s Mode pop-up menu. Once you have a Color Layer, you can paint directly on top of your image using Photoshop’s brush tool while leaving the background layer untouched. To apply the Brush tool for this specific image I worked with a mouse instead of a graphics tablet and stylus because that’s what I’m used to but if you like using a tablet and stylus and are good at it, the process should go smoother and faster.
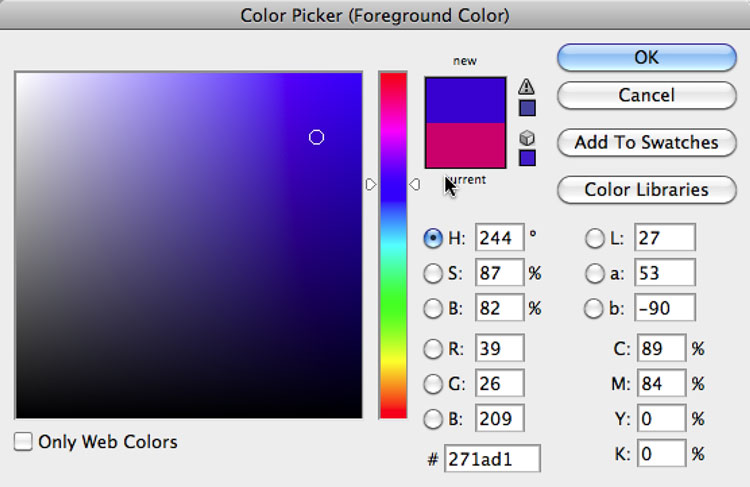
Next, select an airbrush from Photoshop’s Tool Bar. You can use the bracket keys on your keyboard to make the brush smaller (left bracket) or larger (right bracket). I picked a color by clicking on the Foreground/background colors at the bottom of the tool bar. This pops up a color picker and I chose a blue that reminded me of my old 1966 Mustang convertible. You can also choose any color from the Swatches Palette (Window > Swatches) simply by clicking on a color. After painting, you can fine-tune the chosen color by reducing the Opacity of the Color Layer or by adjusting the colors in Color Balance (Image > Adjustments > Color Balance).
When hand coloring, the Eraser tool is your best friend. Even if you use a graphics tablet and stylus it’s impossible (for me anyway) to paint around small details, so don’t try. Just paint and then use the Eraser tool with the image set at a high magnification so you can see those small details and erase the blue (or whatever color) in case you “go outside the lines.” I also used the Eraser tool to remove the blue color from the car’s trim areas such as chrome strip, rocker panel moldings, and logos. This process requires a small brush and patience but makes for more finished looking job.

You can keep adding additional layers, one for each different color, until you think you’re finished. In this case, I used a pale yellow on the wheels and while dedicated Porschephiles will probably cringe at this color scheme on a classic Speedster, I thought it added an element of fun. You can use whatever colors that make you smile. A little tweak with Curves to bump of the contrast and cropping to remove some of the grass at the bottom of photo and you’re finished.
PS You can see of my own Porsche cars in the Related posts at the bottom of this post.
 I’ve found that Life Pixel does a great job with IR conversions and they’ve done most of the conversions for my Canon DSLRs and all of my Panasonic Lumix G-series cameras. This is not a paid or sponsored endorsement, just my experience.
Used copies of my book, The Complete Guide to Digital Infrared Photography are available from Amazon starting around nine bucks as I write this. My book Creative Digital Monochrome Effects has a chapter on IR photography and is available new from Amazon for $11.46 with used copies starting around six bucks as I write this.