It’s CCD week on my photography how-to blog. In several recent posts I’ve talked about taking a look at (older) digital cameras that used CCD sensors and today, I keep the series moving with the Konica Minolta diMage Xt that was used to make this featured image.
Today’s Post by Joe Farace
I was in this restaurant and I asked for something herby. They gave me a Volkswagen with no driver.—Tim Vine
This fast and furious effect demonstrated today isn’t anything new and the concept wasn’t originally digital. Photographers have been using zoom lenses along with slow shutter speeds and zooming during exposure since the first zoom lens was introduced in 1959, which is another story unto itself. The biggest difference in creating this effect with digital techniques is that it’s more controllable and repeatable.
How I Made the (original) photograph: It was made at the parking lot of a strip mall when a friend and I dropped into one of its establishments for lunch. (Always carrying a camera with you is good advice.) The camera used was an 3.2-megapixel Konica Minolta diMage Xt that had a 7.144 x 5.358mm CCD sensor. While the sensor is small, image quality is surprisingly good. The camera even has spot metering! The lens was a 37-111mm (equivalent) f/2.8-3.6 at 37mm. Exposure was 1/750 sec at f/2.8 and ISO 50.

How I Made a Speedy Beetle
- Step 1: I started by using Photoshop’s Levels and Curves functions to improve the original JPEG file’s contrast and brighten the photograph.
- Step 2: When the image looked as good as I could make it, I added a duplicate layer.
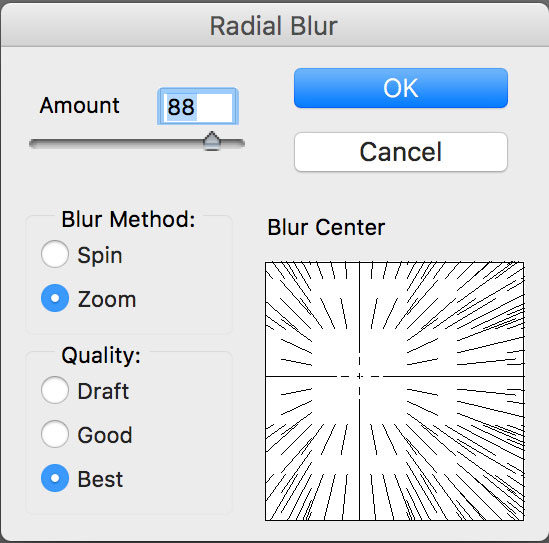
- Step 3: Then I chose the Radial Blur tool from the Filter menu (Filter>Blur>Radial Blur.) I checked the Zoom option and placed the originating point where I wanted the effect to start. In this case, it was left of the windshield but you can put that point anywhere you like. I used the Amount slider to set the length of the zoom blur but you should experiment with different settings until you find one you like for each specific image.
 Step 4: Using Photoshop’s Eraser tool, I erased some of areas on the duplicate (zoom) layer and allowed some of the sharper parts of the bottom original image show through.
While erasing, it’s a good idea to lower the opacity of the zoom layer’s in the Layer’s palette so you can easily see through to the layer below. Don’t set the Eraser at 100% opacity. Use something less and be sure to use a soft-edged brush, so you can control how much is zoom and how much is seen of the original picture. After you’re happy with how the image looks bring the Layer’s palette up to 100% and see if your still happy. If not, try again with a new layer.
You can leave the image with the layers intact and save the image as a TIFF or PSD file or use the Flatten Image command to combine layers and save in the file format of your choice. When finished, you’ll have added motion to a still image and created an image that will be as much fun to look at as it was to create.
If you enjoyed today’s blog post and would like to treat me to a cup of Earl Grey tea ($3.50), please click here. And if you do, thanks so much.