Today’s Post by Joe Farace
Black and white are the colors of photography. To me they symbolize the alternatives of hope and despair to which mankind is forever subjected.—Robert Frank
I have resisted buying into Adobe’s subscription service—didn’t they recently increase prices—mostly because I can’t afford it and have an old computer, blah, blah…. I do realize that active pros need (and can afford) to have and use the latest tools. All of the Photoshop tips, tricks and tools you see referenced on this blog were made using Photoshop CS6. For an interesting perspective on this choice, please read the “Question and Comment” paragraph at the bottom of this linked post that talks about my conversation with a veteran travel photographer and the software he uses for his award-winning work.
Using Channel Mixer for Monochrome Infrared
There are lots of ways to convert your infrared RAW or JPEG file into monochrome and you’ll see many of them featured here on this blog. One way is to use Photoshop’s Channel Mixer to produce grayscale images by letting you choose the percentage of contribution from each source color to the final output channel to create high-quality black and white images. Channel Mixer lets you modify the file by using a mix of the image’s color channels allowing you to add or subtract data from a source channel and transfer it to the output channel. Here’s how I use it:
 Step 1: The image at left was captured using a Panasonic Lumix G5 that was converted for infrared capture by LifePixel by using their Standard IR (720nm) filter. The lens was the Lumix G Vario 12-32mm f/3.5-5.6 at 12mm. The Av exposure was 1/640 sec at f/9 and ISO 400. The RAW file was opened in Adobe Photoshop CS6.
Step 2: The next step was selecting Channel Mixer (Image > Adjustments > Channel Mixer.) After opening, its Control Panel displays your options and controls. Important: Be sure to click the Monochrome check box at the bottom left and set Gray as the output channel in the output Channel pop-up menu. These settings will let you produce a color image that only contains gray values.
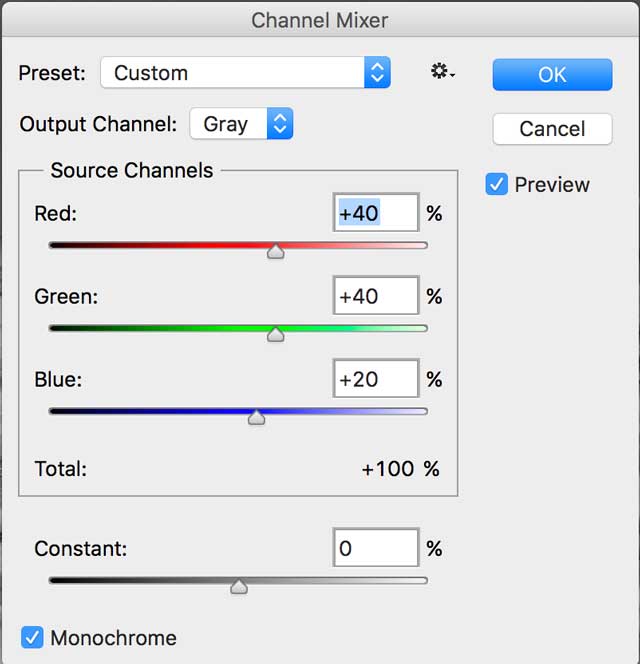 Step 3: Move the sliders to control the amount of detail and contrast in the image you’re converting to grayscale but be sure to watch how changes in each channel affects the final monochrome image, which is “live” as you work on it.
Tip: When adjusting percentages of the source channels, you’ll get the best results when the combined values of the source channels add up to 100%. If you go over 100%, you’ll overexpose an image and if you go under 100%, you will underexpose it, which you my or may not like.

Step 4: After I converted the image to black and white, I layered a Platinum tone from PhotoKit 2 to add warmth to the image. When I was finished, I noticed that the image was slightly noisy, so I applied Dfine to finish it up.
Applying the Channel Mixer command may be all many photographers need to convert their color image files—infrared or not— into monochrome photographs, but if you want more control, it’s time to reach for power tools. More later…
 I’ve found that Life Pixel does a great job with IR conversions and they’ve done some of the conversions for my Canon DSLRs and all of my Panasonic Lumix G-series cameras. This is not a paid or sponsored endorsement, just my experience.
New copies of my book, The Complete Guide to Digital Infrared Photography are available from Amazon for $44.59 with used copies starting around eight bucks as I write this. My book Creative Digital Monochrome Effects has a chapter on IR photography and is available new from Amazon for $11.46 with used copies starting around eight bucks as I writ