It’s CCD week on my photography how-to blog. In several recent posts I’ve talked about taking a look at (older) digital cameras that had CCD sensors and this week. Today I continue the series with the Olympus E-10 that was used to make the featured image.
Today’s Post by Joe Farace
As a child, I used to watch old black-and-white movies and was captivated by the imagery. I think that this influenced my decision to specialize in black and white from an extremely early stage. For me black and white is a purer image which allows greater drama and more expression, be it a portrait or a landscape.” – Antonia Deutsch
One of the easiest and simplest ways to create a black and white photograph from a color image file is to use Photoshop’s Desaturate (Image > Adjustments > Desaturate) or just use the Monochrome command that can be found in some image editing programs. In Photoshop that command is found under Image > Mode > Grayscale) and it basically does the same thing as Desaturate; it simply takes away all of the photograph’s color. But there are other, better, ways to accomplish the same thing…
Channeling the Channel Mixer
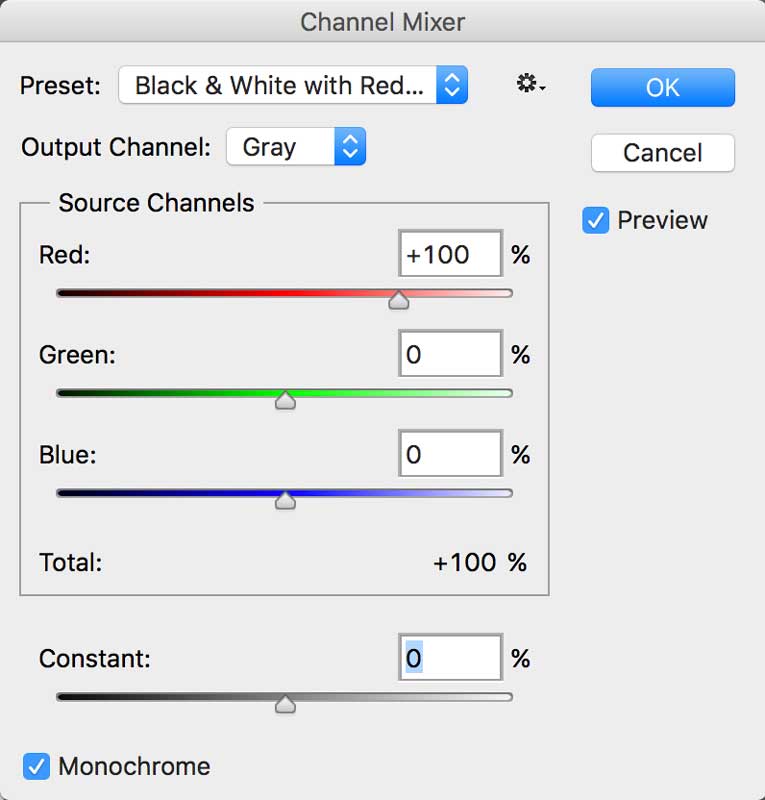
 On the other hand, Adobe Photoshop’s Channel Mixer command (Image > Adjustments > Channel Mixer) produces grayscale images by letting you choose the percentage of contribution from each color channel.
The Channel Mixer modifies a targeted output, in this case grayscale, using a mix of the existing image’s Red, Green, or Blue color channels. When using Channel Mixer, you get to add or subtract data from a source channel to the output; it’s Gray, when the Monochrome box is checked. This is the first step of the conversion and only takes a little more work but with practice you can whip through it.
Step 1: The original image was captured using an Olympus E-10 with an Aperture Priority exposure of 1/500 sec at f/5.6 and ISO 100. The Olympus E-10 is a Four Thirds system DSLR that has a four-megapixel CCD image sensor and was introduced in 2000. The CCD sensor measured 8.8×6.6mm. The lens was a fixed 35–140mm (equivalent) f/2–2.4 optic.
 Step 2: The next step is opening the Channel Mixer dialog box. (Image > Adjustments > Channel Mixer.) Be sure to check the Monochrome box to set Gray as the output channel. This creates an image file that only contains gray values.
Then move the sliders to control the amount of detail and contrast in the image you want to convert to grayscale. You can view how changes in each channel affects the monochrome image because it’s “live” as you work on it. Tip: When adjusting the percentages of the source channels, you’ll get the best results when the combined values of the source channels add up to 100%. If you go over 100%, you’ll overexpose an image and if you go under 100%, you will underexpose the image.
 Beginning with Photoshop CS3, the Channel Mixer was improved to include black-and-white presets, along with the ability to save your own favorite settings as presets for later use. And you no longer have to do the math; a new feature keeps you informed on the total percentage contribution from all three color channels.
Step 3: Applying the Channel Mixer command may be all that most photographers need to convert image files to monochrome—and that’s what I did here— but if you want more flexibility, it’s time to reach for a one of the power tools such as Silver Efex.

If you enjoyed today’s blog post and would like to treat me to a cup of Earl Grey tea ($2.50), please click here. And if you do, thanks so much.
My book Creative Digital Monochrome Effects is available from Amazon and (I think, anyway) is a fun read. There’s even a chapter on infrared photography. It’s available for $16.16 but bargain shoppers can pick up used copies starting at around three bucks. No Kindle version is available at this time.