Today’s Post by Joe Farace
 Yes, there is a downside: In yesterday’s post I wrote that I expected that my future plans for shooting portrait, glamour or boudoir images would be on location since it appears, more than likely, that I’ll be dismantling my home-based studio at the end of the year. (This is my plan as I write this and, to be sure, all plans are subject to change.)
In my former home, before I had an in-home studio, my entire house was a studio and one of my favorite places to shoot was in the kitchen because it had a North-facing bay window.
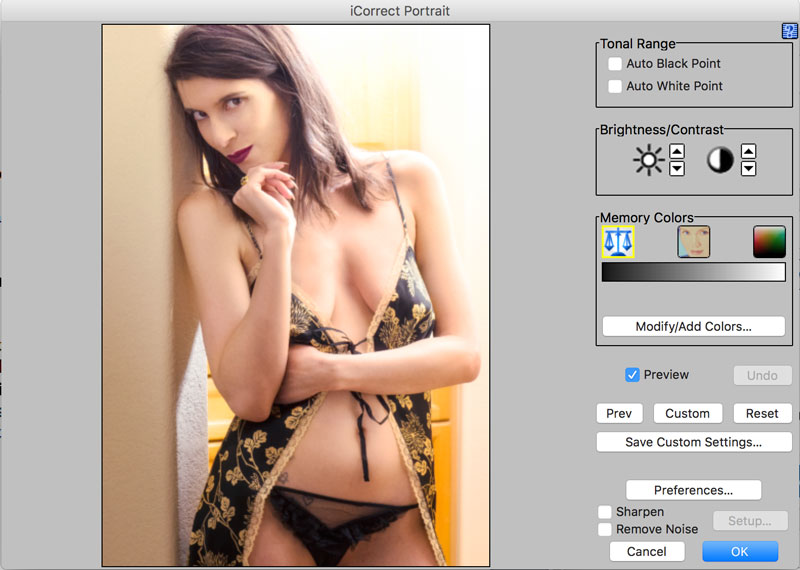 If the upside of shooting portraits in your home is that it’s convenient, the downside is that sooner or later you’re photographs are going to start looking similar to one another. Moving or redecorating are expensive alternatives so the best way to make your photographs different is to make them look different in the digital darkroom. Converting to black and white is one way and here’s another method that I used with the RAW image of Erin Valakari that toy can see above right.
 How I Made this Portrait: I photographed Erin Valakari in the doorway to (what real estate agents would call) a Butler’s Pantry that’s next to the dining room of my current home. I only made four images in this location: For the first one, I used fill flash but I hated the hard look. (See Why I like chimping.) The next three portraits used a mixture of daylight from windows to Erin’s right and a tungsten ceiling light behind her. This was the last image I made and all three appeared a lot more tungsten than daylight. The camera used was a Panasonic Lumix GH4 with image-stabilized Lumix G Vario 14-45mm f/3.5-5.6 lens at 41mm. (If I owned the Panasonic Leica DG Macro-Elmarit 45mm f/2.8 Asph. Mega OIS lens that I have now, that would have been a better choice.) Exposure was 1/100 sec at f/5.6 and ISO 800.
To control the overall color cast I used PictoColor’s iCorrect Portrait plug-in that lightened and gave the portrait a more color correct view. But I didn’t want a cool, natural look, so I used Photoshop’s Fade command to only allow 75% of PictoColor’s correction to show through, keeping the image slightly warm. Then I used some judicious burning and dodging on layers created by PhotoKit 2. Next I used Dfine to knock out some of the noise created by a combination of slight underexposure and high ISO selected. Now, we’re getting somewhere. The image was retouched using Imagenomics’ Portraiture before adding softness from Color Efex Pro’s Glamour Glow filter.
Erin was my most recent muse: To make photographs for how-to posts as well as camera and lens reviews, I like to work with models to make the kind of photographs you see on this blog and, in the near future, a new book. I prefer working with women from ages 21-45 of any ethnicity. No experience is necessary. If you have a friend (or maybe yourself) who would like to be my new muse, please contact me through the Contact page or send an e-mail at joefarace at gmail dot com. We can schedule a test shoot or interview to see if this is something you might like to pursue.

If you’re interested in learning how I shoot available light glamour portraits, please pick up a copy of Available Light Glamour Photography which is available new from Amazon.com for $29.06 with used copies starting around nineteen bucks, as I write this. The Kindle version is $27.63 for those preferring a digital format.